Adding a heat pump alongside a natural gas furnace with tight duct turns
Introduction
We attempted in 2022 to replace our 30-year old air conditioner with an air-source heat pump. Unfortunately, despite repeated service visits, it still does not operate properly. I describe our experiences here in case others with similar systems find this to be useful. Perhaps you landed here by searching for a symptom that you are currently observing in your HVAC system. Maybe this post will help you to ask questions of your HVAC service company that can lead to getting your HVAC system working more quickly than would otherwise be the case and be less likely to be surprised by inoperative air conditioning on the first hot day of summer!
Initial installation
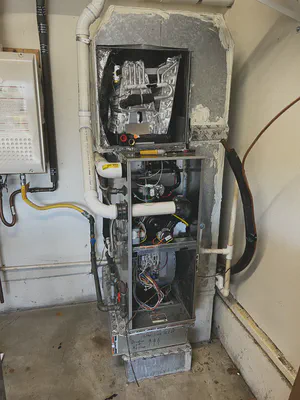
We had a single-stage heat pump installed. The installers replaced our old A-type evaporator coil with an N-type coil. The evaporator coil is the one that is placed inline with the duct work to transfer heat between interior air and the refrigerant. Our HVAC ducts have a 180-degree turn just above our upflow furnace and evaporator coil to direct the air down into ductwork in our crawlspace. That tight turn seems to be a main contributing factor in the problems that I will describe below. The installers sought to improve airflow by inserting additional sheet metal in the cabinet to round out the corners, but that turned out to be inadequate. This added sheet metal is visible to the left of the new coil in the following picture:

Since I kept our high-efficiency natural gas furnace as well, that required me to decide a temperature threshold for switching between the dual fuel options (natural gas and electricity). See https://github.com/mdlemay/heat-pump-analysis/blob/main/heat-pumps.ipynb for more on that.
Diagnosing short cycling in heating mode
When the heat pump was first installed, it could only run for six or seven minutes at a time. This is known as “short-cycling.” It also made loud hissing and gurgling sounds as it was about to shutdown. The HVAC company sent out a technician who measured the coolant pressures as the heat pump was operating, and he determined that the pressures were far too high. He had to remove a substantial amount of coolant to bring the pressures into the proper range. He noted that since we have a very short run of copper tubing between our heat pump and HVAC system, even the coolant that came pre-charged in the heat pump may have been excessive. After he adjusted the pressure, the heat pump apparently worked well for heating. However, that was not the end of the story.
Initial attempt to repair frosting in cooling mode
On the first hot day of summer, we activated the heat pump’s cooling mode. This was a mistake, as we should have tested its cooling function on this new system as soon as possible. That way, we would have beaten the rush of calls to the HVAC installer on the first truly hot day of the year.
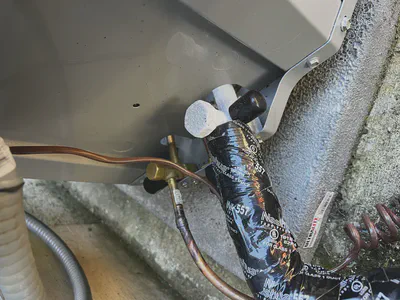
We ran the heat pump in cooling mode for hours, but it was unable to cool our house. When I went outside to inspect the heat pump, this is what I saw:

The refrigerant outlet from the heat pump was frosted over. I reported it to the HVAC installer, and they managed to get us on their schedule quickly despite being inundated with calls due to the heat.
The technician determined that the refrigerant level was too low for effective cooling. However, he wanted to avoid repeating the situation that led to short-cycling in heating mode. So, he diagnosed the airflow around the evaporator coil and determined that too much air was escaping past the new N-type coil. He added sheet metal on the right side of the coil to direct all of the air through the coil.
Unfortunately, this turned out to be ineffective. The system still failed to cool our house, and the refrigerant outlet still frosted over.
Second attempt to repair frosting in cooling mode
Next, the HVAC installer returned for a thorough inspection of the system. He determined that the airflow around the evaporator coil was insufficient. He proposed either replacing the N-type coil to revert back to an A-type coil or to expand the ductwork vertically above the evaporator coil to create a freer flow of air around the tight turn in that duct.
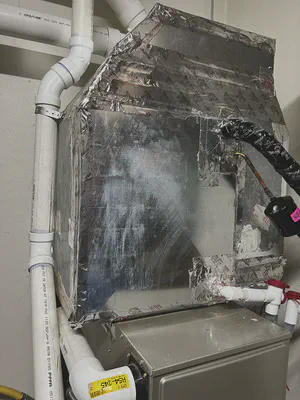
He decided to first replace the coil. However, once he had installed it, he concluded that it still needed more space around it for proper airflow. His options for achieving that were limited due to an unfortunate decision by the plumber who installed our tankless water heater to route the exhaust pipe only a short distance above our ductwork. So, the HVAC installer just increased the headroom in the duct as much as he could, as you can see below in comparison to the earlier pictures.

After all that, the system finally provides adequate cooling. It still allows the indoor temperature to creep up in the afternoon on the hottest days like the system that it replaced also allowed, but it seems that a much more substantial overhaul of our HVAC system would be needed if we wanted to avoid that.
Continued short cycling in heating mode
When heating season descended once again, the system again exhibited short cycling, although it was at least able to run longer (e.g., 37 minutes in one instance) than it did prior to the system enhancements described above.
An HVAC technician came up with a hypothesis that the return air duct was too constricted. He tested this by removing the filter and filter door, i.e., sucking in air from the garage directly. This allowed the system to run for 1.25 hours, and the technician thought that installing an additional return duct might provide even more airflow than that and allow continuous operation. That would have been an invasive change in our home layout, though. It also was not guaranteed to resolve the issue. So, we opted not to go that route.
For now, we continue to rely on natural gas for our home heating.